Web
AI to the Rescue: How to Redesign an Existing Website the Smart Way
Jul 31, 2026
Why Redesigning an Existing Website Can Make or Break Your Online Business
Quick Answer: How to Redesign an Existing Website
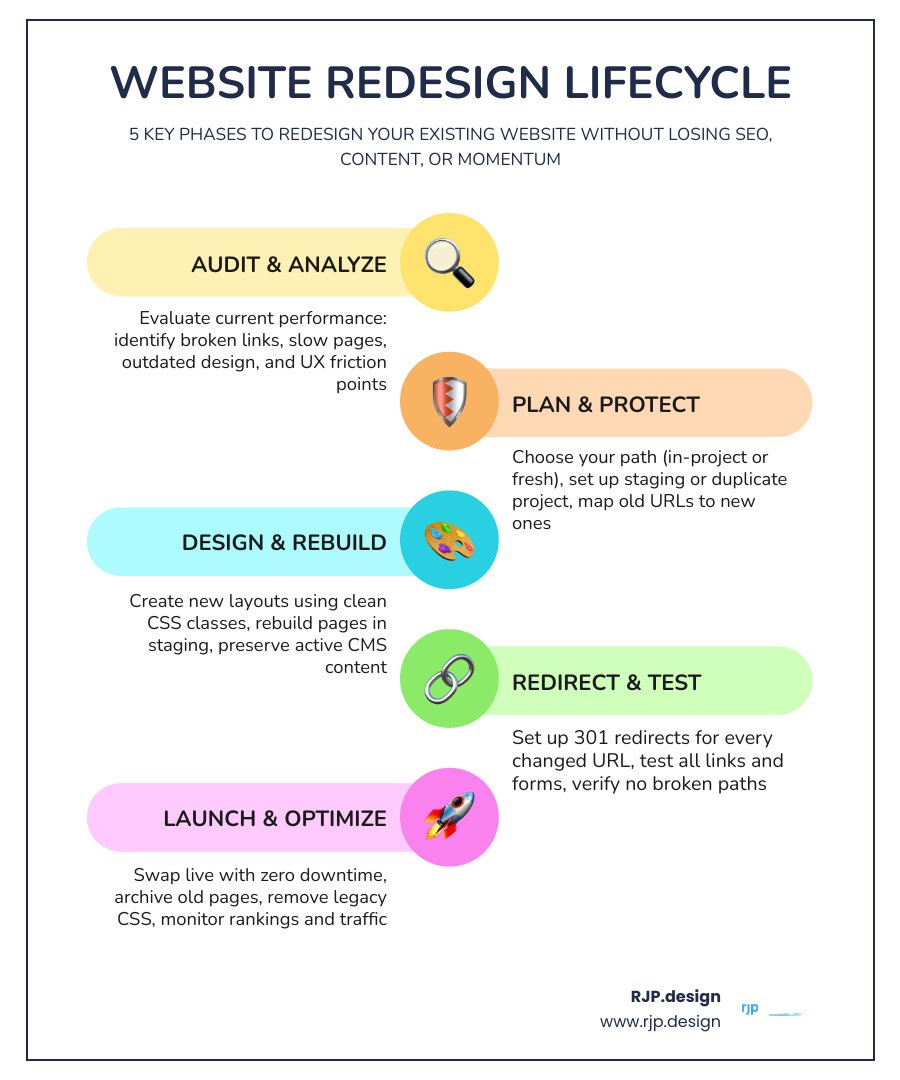
Audit your current site — identify what's working, what's broken, and what needs updating.
Choose your redesign path — work within the existing project or start fresh in a new one.
Protect live content — use staging folders or a duplicate project to avoid breaking active pages.
Rebuild page by page — design new layouts with new classes before touching anything live.
Set up redirects — map old URLs to new ones before going live to protect your SEO.
Launch and clean up — swap the new design live, archive old pages, and remove legacy CSS.
When you redesign an existing website, you're not just changing how it looks — you're making a direct investment in how your business performs online. Consider this: 75% of users judge a company's credibility based on its website design alone. And 88% of online consumers say they're less likely to return after a bad experience. That's not a small margin for error. That's most of your audience, gone after one visit.
A well-executed redesign can increase conversion rates by up to 30% and drive an average 22% increase in traffic within the first year. Those numbers are hard to ignore.
But here's the challenge most business owners run into — how do you redesign a live site without breaking what's already working? Especially if editors are updating content every week, CMS collections are growing, and your current URL structure is already indexed by Google. One wrong move and you've got broken links, lost rankings, and frustrated users.
That's the real problem this guide solves.
I'm Ross Plumer, a digital marketing and web design strategist who has helped businesses market over $20 million in revenue — many of those projects involving the kind of careful, high-stakes work it takes to redesign an existing website without losing momentum. In the sections ahead, I'll walk you through exactly how to do it the smart way.
How to Redesign an Existing Website: The Ultimate Step-by-Step Workflow
A successful redesign is about much more than a fresh coat of paint. It is a strategic effort to improve your user experience, increase conversions, and optimize search engine performance.
In July 2026, page experience is more critical than ever. In fact, 47% of users expect a website to load in 2 seconds or less. A modern technical restructure as part of your redesign can improve load times by 20% to 30%, giving your SEO and user engagement a massive boost.
To do this safely, we must follow a structured, step-by-step workflow that keeps your live business running smoothly while we build your new digital storefront in the background. For a deeper look at high-level strategies, check out our guide on Website Revamp Best Practices 2025.
In-Project vs. Fresh Project: Choosing Your Redesign Path
One of the first and most critical technical decisions we must make is where the redesign will actually take place. Should we build it directly inside your existing Webflow project, or start completely fresh in a brand-new project?
Both paths are highly effective, but they serve very different scenarios. The right choice depends heavily on how complex your current site is, how clean your existing CSS is, and whether you are actively updating your CMS.
Feature / Criteria | In-Project Redesign (v2 Folders) | Fresh Project Rebuild (From Scratch) |
|---|---|---|
Best For | Active CMS sites with frequent updates, smaller sites, and clean existing CSS structures. | Sites with heavy legacy class clutter, outdated structures, or those migrating to a new CSS framework. |
CMS Migration Effort | Zero. All existing collections, items, and references remain intact and untouched. | High. Requires exporting/importing CMS data, rebuilding relationships, and manual syncing. |
SEO Risk | Low. URL structures, folders, and hosting settings remain unchanged. | Medium. Requires careful setup of 301 redirects and matching of page structures. |
Styling Environment | Can feel cluttered if old classes are not systematically managed or isolated. | Completely clean slate. No legacy CSS code or unused assets slowing down your workspace. |
If you choose the in-project route, you will build the new pages within a dedicated "v2" folder while keeping the live pages intact. If you choose a fresh project, you will duplicate the site to strip static pages or build entirely from scratch in a clean workspace. To help you weigh these options further, read our Website Redesign Complete Guide.
How to Redesign an Existing Website with an Active CMS
What happens when your website has active contributors publishing blog posts, adding portfolio items, or updating team profiles every single week?
If you try to redesign in a duplicated, separate project, you run into a major synchronization problem. While you are designing the new look over a period of four to six weeks, your team is still adding new content to the live site. When you are ready to launch, your new project will be missing weeks of fresh content.
To solve this, we have two primary paths:
The In-Project Redesign (Highly Recommended for Active CMS Sites): By keeping the redesign inside the same project, your content editors can continue updating the live CMS collections without interruption. The new "v2" pages simply pull from the exact same database. When we go live, we just swap the page connections.
Automated Cross-Project Syncing: If we must build in a fresh project, we can use automation tools like Zapier or Make to bridge the gap. We set up a workflow where any new item added to the live site's CMS is automatically duplicated and published in the development project's CMS.
This ensures that no data is lost and your team’s publishing workflow remains completely uninterrupted. You can explore more about managing complex content transitions in our Complete Website Redesign Guide.
Integrating Modern CSS Frameworks Like Lumos
If your current website is a few years old, it likely suffers from "class soup" — hundreds of randomly named, redundant CSS classes that bloat your site and make updates a nightmare. A redesign is the perfect opportunity to implement a modern, utility-class CSS framework like Lumos or Client-First.
But how do you bring a structured framework into a site that already has thousands of old classes?
If we are working within the same project, we cannot simply merge a framework template directly, as it may conflict with existing global styles. Instead, we create a clean, isolated style guide page. We build the framework's core utility classes on this page first. When building our new "v2" layouts, we use only these new framework classes.
This allows us to maintain a clean, scalable design system for the new pages without breaking the styling of the old, live pages. Over time, as the old pages are retired, the legacy classes can be safely purged. For professional execution of this clean framework integration, check out our Web Redesign Service.
Step-by-Step Guide to Redesign Existing Website Pages Safely
To execute the redesign without causing live-site errors, we follow a strict safety protocol.
Create a Dedicated Style Guide: Build a central style guide page in your project. Define your typography, color variables, button styles, and spacing containers using your new CSS framework.
Set Up a "v2" Staging Folder: Create a page folder named "v2" (or "redesign") and set it to draft status or password-protect it. This is your safe sandbox.
Duplicate and Move Pages: Duplicate your existing static pages and move the duplicates into the v2 folder.
Build with New Classes: Rebuild your layouts on these duplicated pages. Never reuse old, messy classes on your new designs; always use the clean class structure from your new style guide.
Prepare the CMS Templates: For dynamic pages (like blog posts), create a duplicate "v2" layout within the CMS collection page template. Keep the old layout wrapped in a conditional visibility wrapper that only shows for live users, while you design the new layout inside a separate wrapper.
Once all your new pages are built, styled, and thoroughly tested, you are ready to transition to the launch phase.
Launching Your Redesigned Site Safely Without Downtime
The build is complete, the designs look incredible, and the client is thrilled. Now comes the most critical part of the entire process: taking the new site live without losing your search engine rankings or causing broken links for your visitors.
Managing 301 Redirects and URL Structures
When you redesign an existing website, changing your URL structure can be incredibly dangerous for your SEO if it isn't handled correctly. If Google has already indexed your page at yourdomain.com/our-services and you change the new page URL to yourdomain.com/services, any user clicking the old link from search results will hit a frustrating 404 "Page Not Found" error. Worse, you will lose the search authority that page built up over the years.
To prevent this, we create a comprehensive URL mapping spreadsheet before making any changes.
We list every single active URL on your current site in column A, and its corresponding new URL in column B. If a page is being consolidated or deleted, we map it to the closest relevant live page.
Before launching, we upload this entire map directly into your hosting settings as 301 redirects. This tells search engines and browsers that the page has permanently moved to a new home, preserving your hard-earned SEO authority and keeping the user journey completely seamless.
Swapping the Redesigned Site Live with Zero Downtime
The final step is the "live swap." If we built the redesign within the same project, this process is incredibly clean:
Change the URL of your old homepage to
/old-home.Move your newly designed homepage out of the v2 folder and set its URL slug to
/(the root homepage).Update your main navigation menus to point to the new page URLs instead of the old ones.
Publish the project to your custom domain.
Safely archive your old pages by setting them to draft status, keeping them as a backup in your designer workspace without showing them to the public.
Run a final site-wide cleanup to purge unused classes and assets, keeping your site's code incredibly lightweight and fast.
At RJP.design, we pride ourselves on managing this entire transition with absolute precision. Our down-to-earth team is dedicated to your satisfaction, ensuring that your website transition is smooth, stress-free, and highly successful.
If you are ready to take your business to the next level with a seamless, high-converting digital presence, read our Web Redesign Agency Complete Guide to see how we can bring your vision to life safely.