Web
How to Create a Custom Shopify Page Template: A Step-by-Step Guide
Jun 10, 2026

Why Your Shopify Page Template Choice Shapes Your Entire Store
A Shopify page template is the foundation that controls how every page in your online store looks and functions — and choosing the right approach from the start can save you hours of frustration down the road.
Quick answer: What is a Shopify page template?
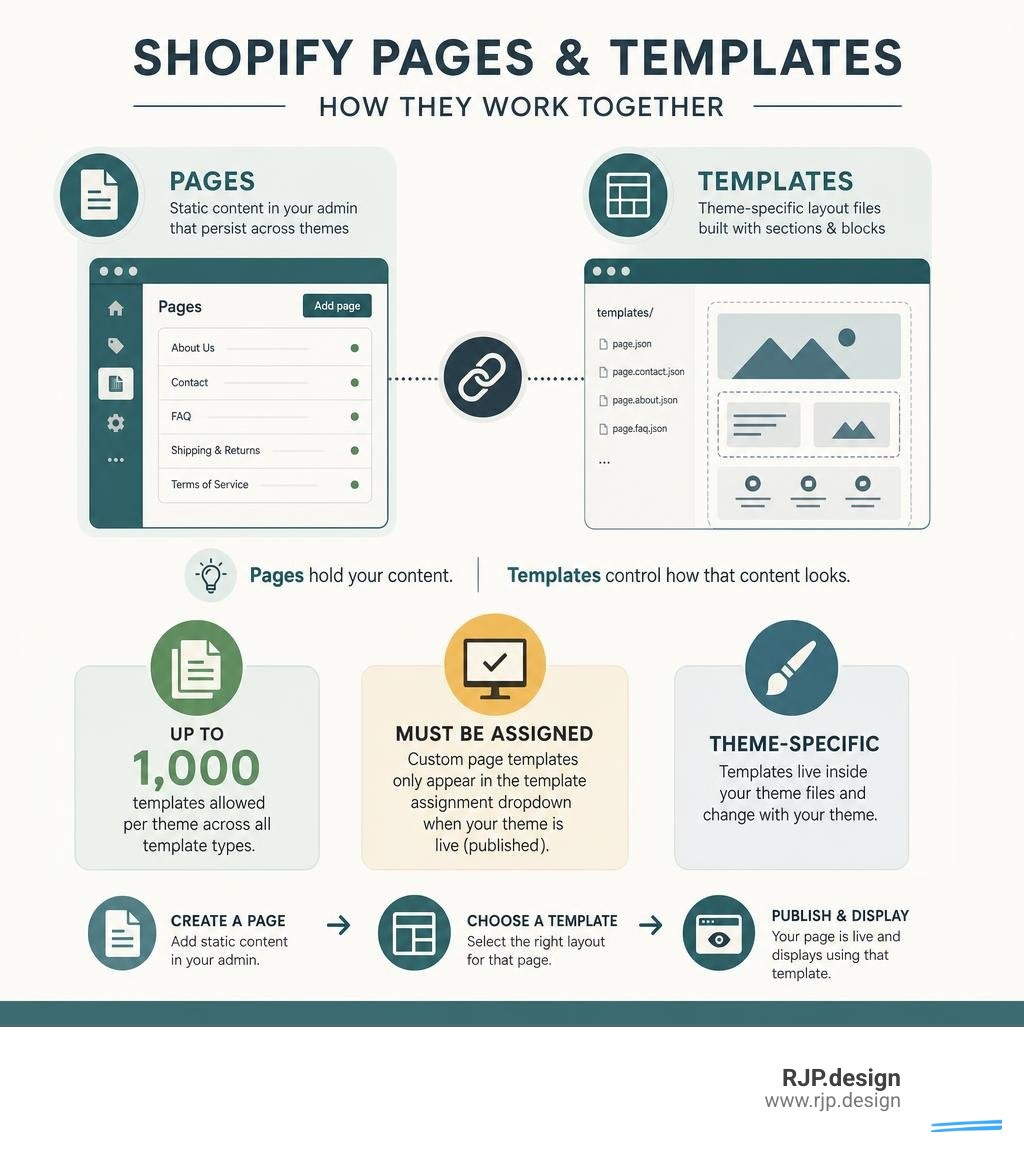
A page template is a group of sections configured in your theme that controls the layout and content display for a specific type of page (product, collection, about us, etc.)
Templates are theme-specific — they live inside your theme files and are built using JSON or Liquid code
Pages (created in Shopify Admin under Online Store > Pages) are static content entries that persist across theme changes
You can have up to 1,000 templates per theme across all template types
Custom page templates only appear in the template assignment dropdown when your theme is live (published)
Here's where many store owners get tripped up: Shopify uses the word "pages" to mean two completely different things. There are Pages — the static content entries you create in your Shopify admin — and there are page templates, which are the theme-level layout files that control how those pages are displayed. Conflating the two is one of the most common sources of confusion for merchants, and it can lead to real headaches when switching themes or trying to create unique layouts.
Every Shopify store ships with a default template for each content type. But the moment you want an About Us page that looks different from your Contact page, or a landing page built for a Black Friday campaign, you need a custom page template — and that requires a slightly different workflow than most beginners expect.
I'm Ross Plumer, a digital marketing and web development expert with experience helping businesses market over $20 million in revenue, including guiding brands through the nuances of Shopify page template architecture to build stores that convert. In the sections below, I'll walk you through everything you need to know — from understanding the Pages vs. Templates distinction to creating, assigning, and maintaining custom templates without breaking your store.
Demystifying the Shopify Page Template: Pages vs. Templates
When managing your online store in June 2026, understanding how your site's structure is built is key to keeping your content organized and your design cohesive. The confusion between "Pages" and "Templates" is incredibly common, but once you break down the theme architecture, it becomes much simpler.
Think of a Page as the raw content (the text, images, and SEO settings you input into the Shopify admin) and the Template as the visual skeleton (the arrangement of banners, grids, slideshows, and text blocks) that displays that content.
To make this distinction crystal clear, here is a quick breakdown of how they compare:
Feature | Shopify Pages | Shopify Templates |
|---|---|---|
Primary Purpose | To hold raw, static text and media content. | To control the visual layout, sections, and block order. |
Portability | Highly portable; content persists even if you switch themes. | Tied directly to a specific theme; does not transfer automatically. |
Creation Location | Shopify Admin under Online Store > Pages. | Theme Customizer or theme code editor. |
Coding Required? | No code needed. | None for basic JSON layouts; Liquid/HTML is optional. |
Limits | Unlimited. | Maximum of 1,000 JSON templates per theme. |
Understanding this relationship is crucial when building the Best Shopify Store Designs that look professional and load quickly. For a deeper dive into default configurations, you can explore the Shopify Help Center | Templates documentation.
Understanding Shopify Pages vs. Templates
To understand why this distinction matters, we have to look at how Shopify handles data. When you create a Shopify Web Page, you are generating a database entry. According to the developer-facing Page API, a page object contains fields like title, body HTML, handle, and SEO metadata. Because this data is stored in Shopify's database, it remains safe and untouched even if you completely swap out your theme.
Templates, on the other hand, are theme-specific files. If you are using Online Store 2.0 (the modern standard in 2026), these are JSON files located in your theme's templates directory. They tell Shopify: "When rendering this page, load these specific sections in this exact order."
If you edit a default template visually in the theme customizer—for example, by adding a custom video section to your default page template—that video will show up on every single page using that default template. If you want a unique layout for your "Our Story" page without affecting your "FAQ" page, you must create a custom shopify page template. Managing this architecture correctly is a cornerstone of professional Shopify Development and high-converting Ecommerce Website Design.
How to Create a Custom Shopify Page Template
Creating a custom shopify page template is straightforward, thanks to Shopify's visual theme editor. Since the rollout of Online Store 2.0, you can spin up new JSON templates without writing a single line of code.
Before we jump into the steps, keep in mind that a theme can contain a maximum of 1,000 JSON templates in total. Additionally, each JSON templates file can render up to 25 sections, with each section supporting up to 50 blocks. This gives us immense flexibility to Build Custom Ecommerce Site layouts.

Here is how to create a custom template step-by-step:
Access the Theme Editor: From your Shopify Admin, go to Online Store > Themes. Find the theme you want to edit and click Customize.
Open the Template Selector: At the very top of the screen, click the central dropdown menu (which default-shows "Home page").
Navigate to Pages: Hover over Pages and click + Create template.
Name Your Template: Give your template a clear, descriptive name (e.g.,
about-usorlanding-campaign).Select the Base Template: Choose an existing template (usually "Default page") to inherit its sections. This gives you a cost-effective starting point so you don't have to build from scratch.
Save: Click Create template.
Once created, you can add, delete, and reorder sections (like slideshows, newsletter signups, or product grids) to design your custom layout.
Assigning and Previewing Your New Shopify Page Template
Creating your template is only half the battle; now you need to assign it to your content. To do this, we bridge the gap between your theme files and your actual admin pages.
Go to Online Store > Pages in your Shopify dashboard.
Click on the page you want to update (or click Add page to create a new one).
On the right side of the screen, locate the Online store card.
Under the Theme template dropdown, select your newly created template.
Click Save.
If you want to apply a template to multiple pages at once, you can use the Shopify bulk editor. Furthermore, you can preview how your resources look with the new layout by selecting different pages directly in the top preview bar of the theme editor. This is incredibly helpful when building a Professional Online Shop because it allows you to test content rendering before going live.
For developers looking to understand how the underlying rendering system functions, the official page template documentation provides detailed insights into the template directory structure. Structuring this correctly is a vital step outlined in our Online Retail Store Website Design Guide.
Enhancing Layouts with Metafields and JSON Templates
If you have ten different service pages that share the exact same visual layout but require unique text, images, or files, creating ten separate templates is a maintenance nightmare. Instead, we use metafields to make a single template dynamic.
Metafields allow you to attach custom data fields to your Shopify pages. In the theme editor, instead of typing static text directly into a section, you can click the "Connect dynamic source" icon (which looks like a stack of coins) and link the setting to a page metafield.
By combining the structural guidelines found in the Shopify Help Center | Templates resource with metafields, you can build incredibly rich layouts. This keeps your site lightning-fast, highly editable, and optimized for the Best Ecommerce Sites UX. Plus, keeping your content dynamic and structured is highly beneficial for SEO for E Commerce Websites.
Best Practices for Theme Updates and Portability
Because custom templates live inside your theme files, they do not automatically migrate when you buy a new theme or perform a major redesign. To protect your hard work, keep these best practices in mind:
Keep core content in the Page editor: Always write your main body copy and SEO metadata in the standard Shopify Page editor. This ensures your core information is highly portable and won't disappear when switching themes.
Backup your work: Before making direct code adjustments, duplicate your live theme.
Use clear naming conventions: Name your custom templates logically (e.g.,
page.contact-wholesale.json) so future developers or team members understand their purpose.Avoid hardcoding static values: Use sections, blocks, and metafields rather than hardcoding text or image URLs directly into Liquid code.
Following these practices will keep your site organized, making any future Ecommerce Website Redesign Guide 2026 projects seamless while maintaining your established SEO for Online Stores rankings.
Troubleshooting Common Template Issues
Working with templates can occasionally throw a wrench in your workflow. Here are the most common issues merchants run into and how to fix them:
"My custom template isn't appearing in the dropdown!" This is the number-one issue Shopify merchants face. Custom templates are contextual to the theme they were created in. If you created your new template in an unpublished (draft) theme, it will not appear as an option in your Page editor dropdown. To assign it, you must either publish the theme first or preview the template within the theme editor itself.
"I edited my page layout, and now all my other pages changed too!" You edited a shared template (likely the default page template) instead of creating an alternate template. To fix this, create a new custom template, assign it to the specific page, and then edit that custom template individually.
"I hit a template limit error." Shopify limits you to 1,000 JSON templates. If you are running an automated setup that generates unique templates for thousands of pages, you will hit this ceiling. Consolidate your layouts by using dynamic metafields instead of unique templates.
If you are experiencing complex layout issues or need custom Liquid functionality, working with a Top Rated Ecommerce Development Agency can save you time and keep your store running flawlessly.
Conclusion: Elevate Your Store Design
Mastering the shopify page template system gives you the creative freedom to design a beautiful, high-converting storefront without sacrificing data portability or site speed. By understanding when to use static pages and when to deploy dynamic JSON templates, you set your business up for long-term scalability.
At RJP.design, we specialize in creating stunning websites and enhancing online presence for businesses. We make sure your store not only looks incredible but is also highly functional and easily found online. Our down-to-earth team prioritizes client satisfaction, delivering high-quality, custom solutions tailored to your brand's unique needs.
Ready to take your store design to the next level? Partner with a premier Shopify Ecommerce Development Agency and Get professional help from RJP.design today.

